User Guide
This is a user guide for the Radiator Heat Output Survey Tool (RHOST) app. The guide covers how to use all main features of the app such as account creation, topping up your account’s balance, and step-by-step instructions for creating a new survey.
About RHOST
RHOST is a simple and easy to use app for conducting heat output surveys. Using augmented reality and artificial intelligence, users can accurately measure and record characteristics of radiators with just their device’s camera. Used alongside the Radiator Heat Output Surveying, Calculation, and Reporting Service (RHOSCARS), heat output reports can be generated and viewed effortlessly.
User Types
There are 2 different types of users in RHOSCARS: Primary users and secondary users. The differences are outlined below:
User Guide Key
The following icons are used throughout this guide to indicate who can perform a task and whether the task is performed in the app, web browser, or both:
Getting Started
Installing the App
RHOST is available for both iOS and Android devices. As it uses artificial reality, devices need to be AR compatible to use its features. For iOS devices, iOS of 13 or higher is required. For Android devices, you can see if your device supports AR by checking if it appears on this list.
To install the app, do as follows:
- Open your device’s app store (Play Store for Android, App Store for iOS).
- Enter
rhostinto the search bar. - Select the Rhost app and go to its app page.
- Alternatively, use these links:
- Install the app
Creating an Account
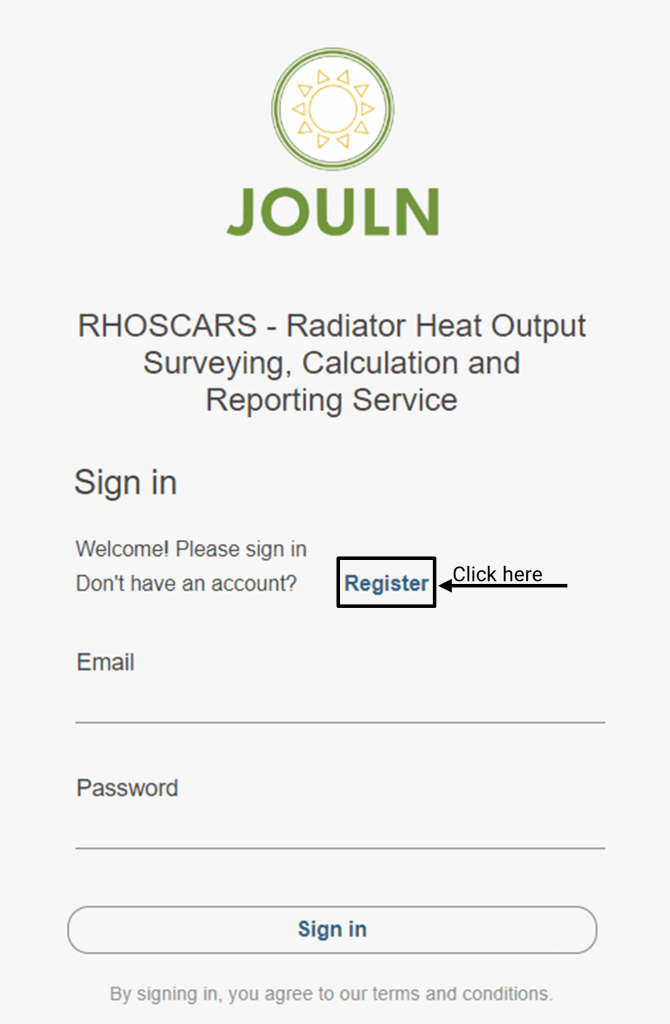
An account is required to use RHOST. If you already have an account, skip to the next section. Otherwise, follow these steps to create an account:
- Open the RHOST app or go to RHOSCARS.
- Click
register, as shown, to switch from the log in page to the register page. - Enter the email and password you would like to use for this account.
- Click the
registerbutton to create your account.
Opening the App for the First Time
Now that the app is installed and you’ve created your account, it’s time to open the app! On opening the app for the first time, you will be greeted with either a sign in page like the one used to create your account, or the home page. If you’re not already signed in, enter your account’s email and password and press the “sign in” button. The app will keep you signed in so you will only see this screen once unless you sign out or clear the app’s data.
App Overview
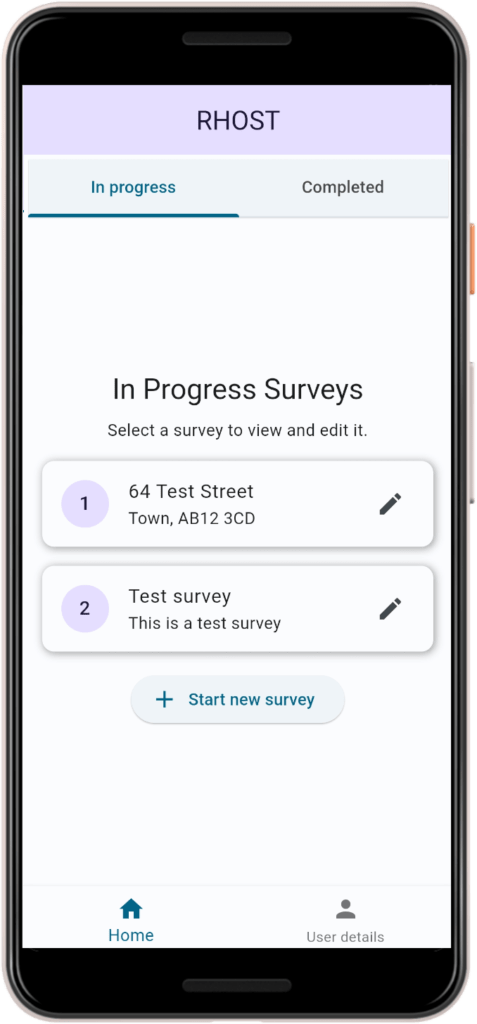
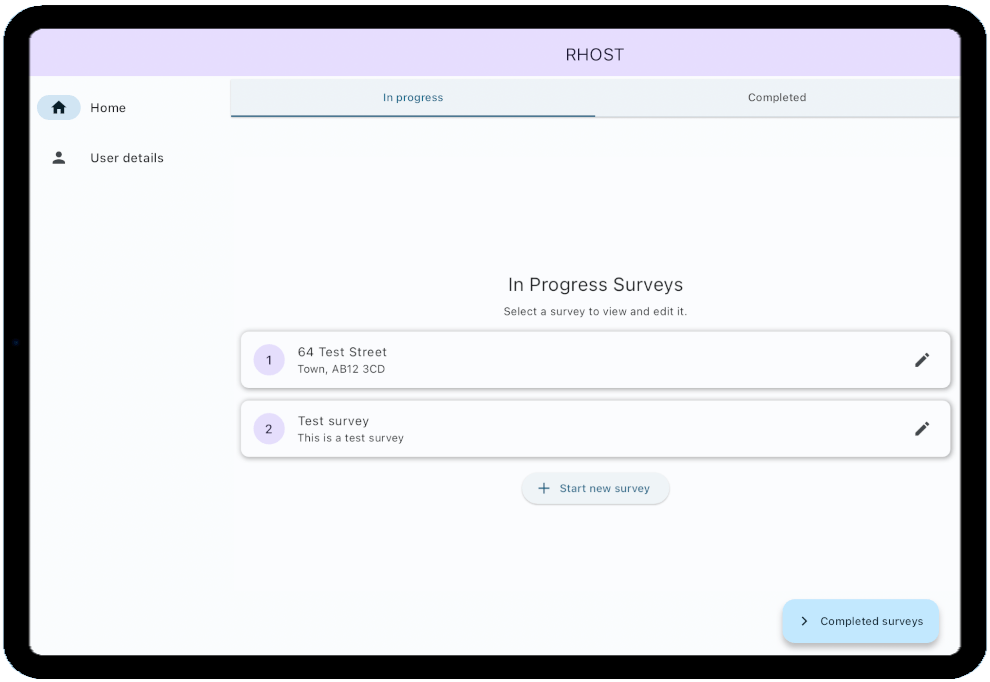
This is the RHOST home screen. From this page you can view all surveys, edit them, start a new survey, view reports, and view your account details.
Refreshing the Surveys
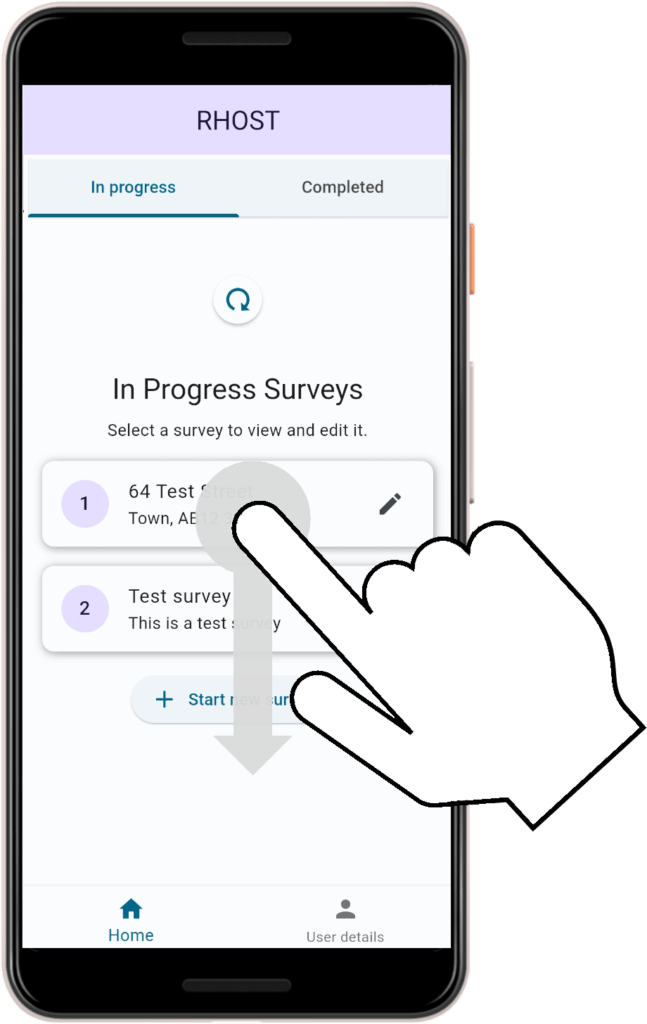
To refresh the list of surveys, drag down on the screen and release. a small loading icon will appear at the top of the screen to indicate the survey list is being refreshed.
Start a New Survey
To begin a new survey, press the start new survey button.
Edit a Survey
You can add edit a survey by navigating to the in progress tab and selecting it from the list. Go to the Editing a Survey section for more details.
User Details

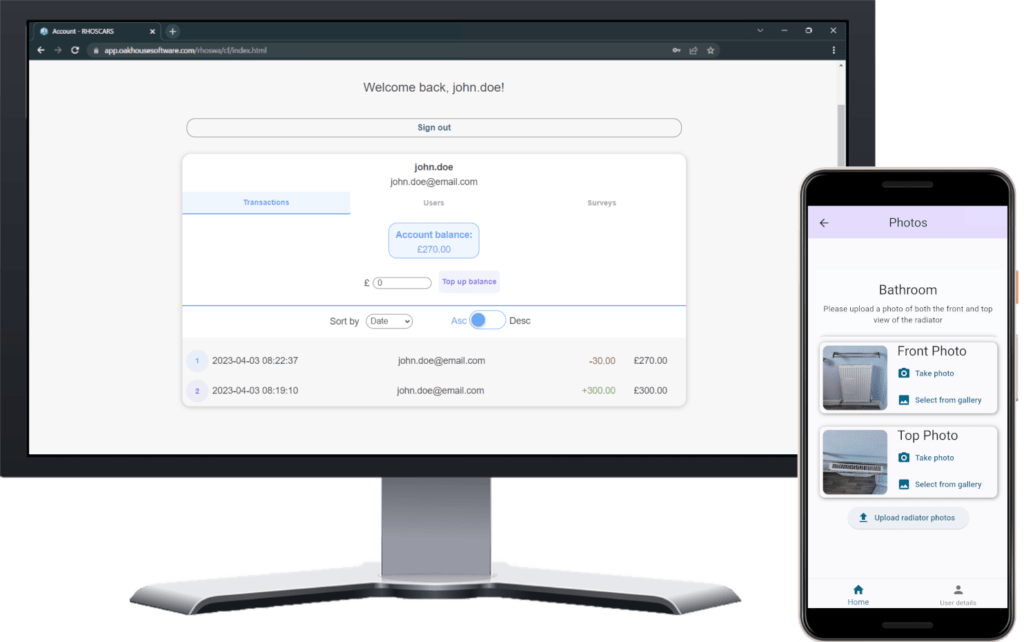
You can view your account details by selecting the user details tab. On this screen, you will be able to see your username, account balance, and the current cost of survey reports. Using the top-up and manage buttons, you can top-up your balance and manage your associate users. You can also sign out of your account.
Topping Up Account
If you don’t have enough money in your account balance to pay for a survey, you will need to top up your account. To top up your account, do as follows:
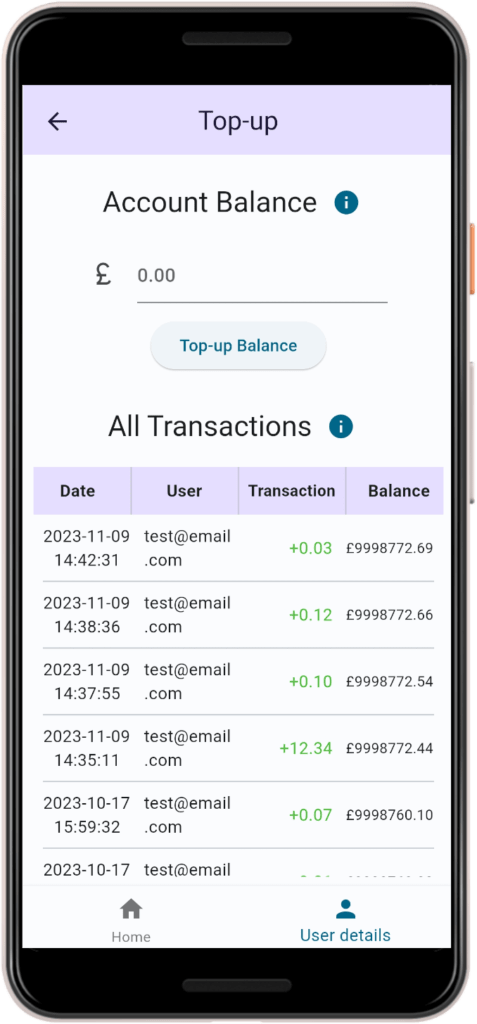
- On the user details page, press the
top-upbutton in the associates user section. - Here you will be able to view all the transactions associated with your account.
- Enter an amount and press
top-up balance. - You will be taken to the Oakhouse Software checkout page.
- Fill out the checkout form and press
place order. - Your balance will be updated and you should receive an email receipt.
- If your account balance hasn’t updated or you haven’t received a receipt to your email, please get in touch with us via our contact us page.
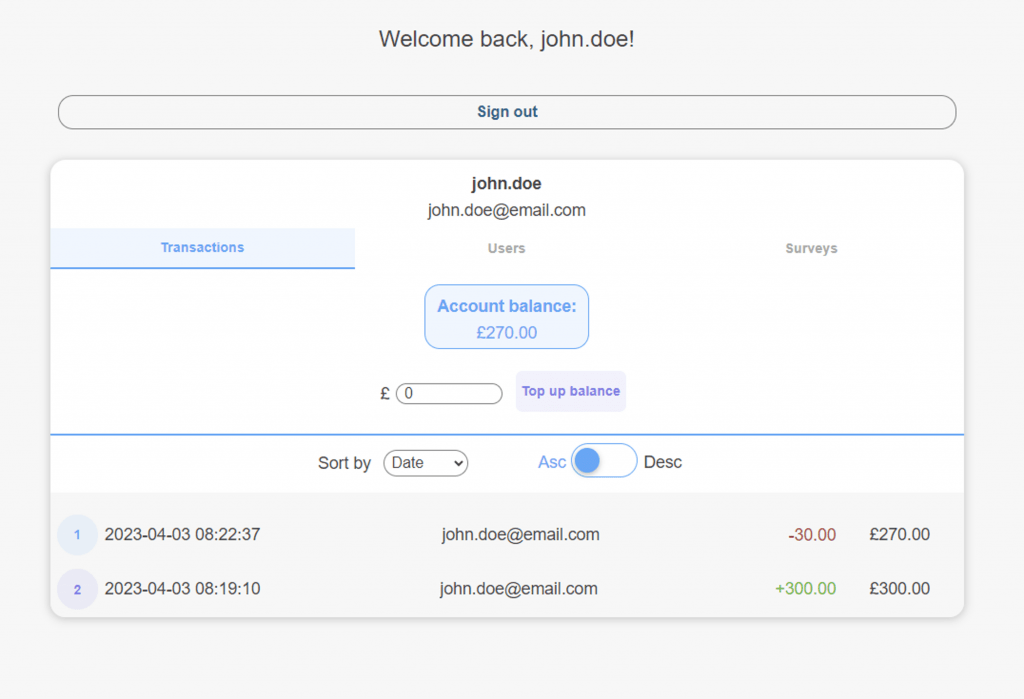
- Go to RHOSCARS.
- If not already, sign in to your account.
- In the text field below the current account balance, enter the amount you would like to add to your account.
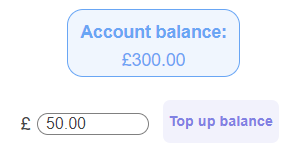

- Press
top up balanceto be redirected to the checkout page. - Fill out the checkout form and press
place order. - You will be redirected back to RHOSCARS, and your balance will be updated.
- You should receive an email receipt.
- If your account balance hasn’t updated or you haven’t received a receipt to your email, please get in touch with us via our contact us page.
Adding Associate Users
If you would like to add associate users to your account, do the following:
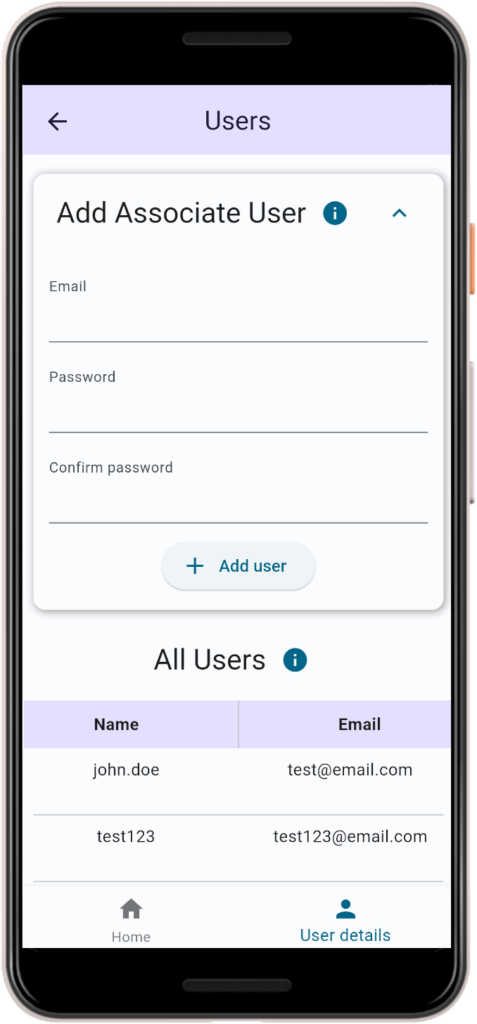
- On the user details page, press the
managebutton in the associates user section. - Here you will be able to view all the users associated to your account.
- Expand the
add associate usersection - Enter their desired login details and click
add user. - The associate user will now be able to log in to their account.
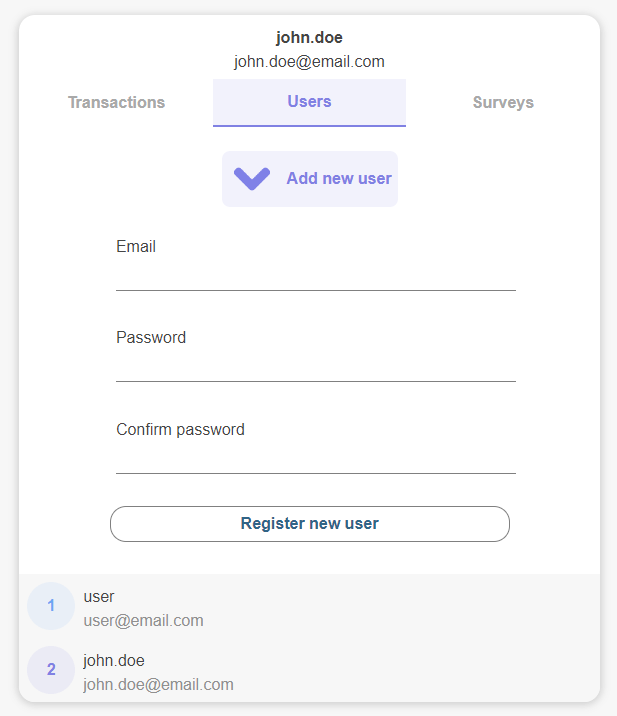
- Go to RHOSCARS.
- If not already, sign in to your account.
- Navigate to the
userstab. Here you will be able to view all the users associated to your account. - Click the
add new userbutton. - Enter their login details and click
registernew user. - The associate user will now be able to log in to their account.
Carrying Out a Survey
Creating a Survey
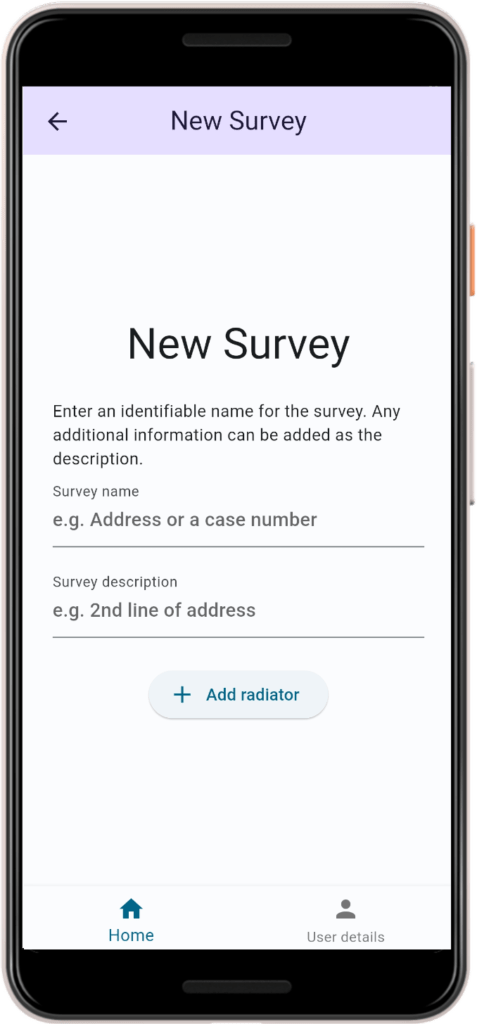
- On the home page, navigate to the
in progresstab pressstart new survey. - Enter an identifiable name in the survey name field e.g., the 1st line of address or a case number.
- Enter any additional information in the survey description field e.g., the 2nd line of address.
- Press the
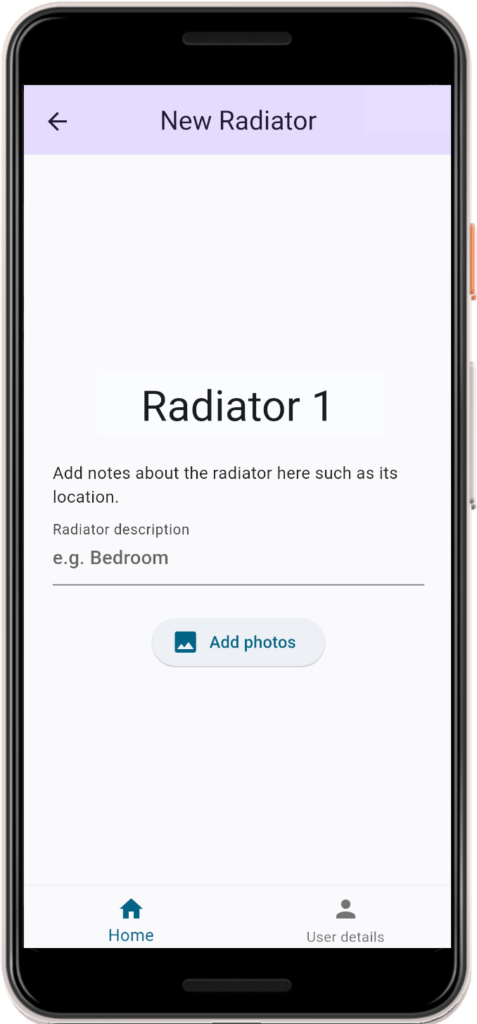
add radiatorbutton. - Enter a description for the radiator e.g., the room it’s located in.
- Press the
add photosbutton to add the radiator to the survey.
Uploading Radiator Photos
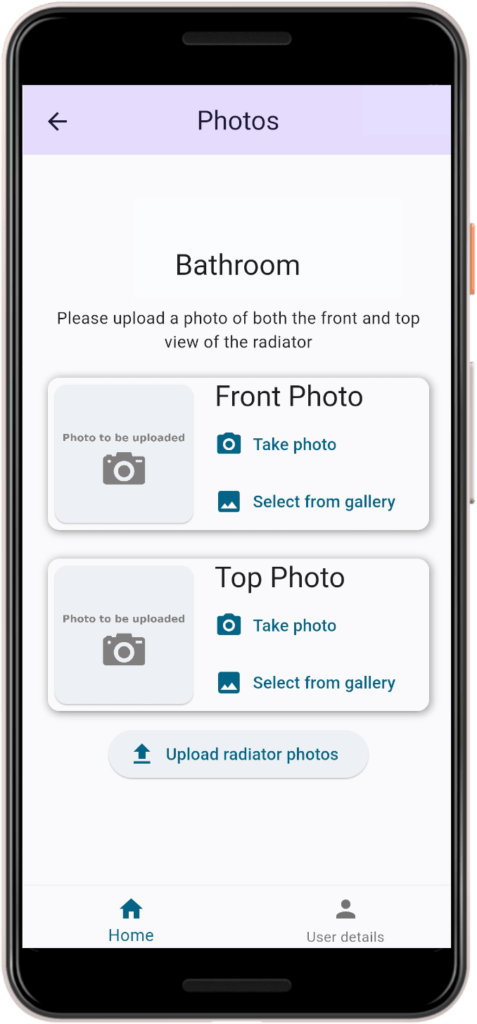
A photo of the front of the radiator and the top of the radiator are required. These photos can be taken with your camera by pressing take photo or they can be uploaded from your device’s gallery by pressing select from gallery.
Measuring a Radiator
To get the measurements of the radiator, you can either use augmented reality to measure the radiator, or you can upload a photo from your gallery and enter the measurements in manually.
Using AR to Measure a Radiator
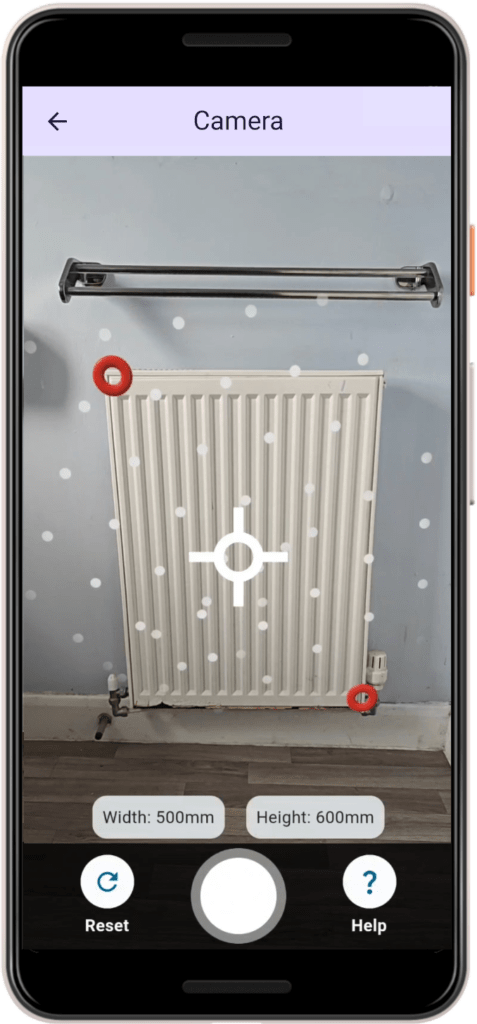
- Press the
take photobutton. - Move your device around to scan the room.
- Your radiator will be recognised as a surface and have a geometric plane appear over it (see screenshot).
- Move the camera to align the top left radiator corner with the centre of the screen.
- Tap the screen to place a marker.
- Repeat for the bottom right radiator corner
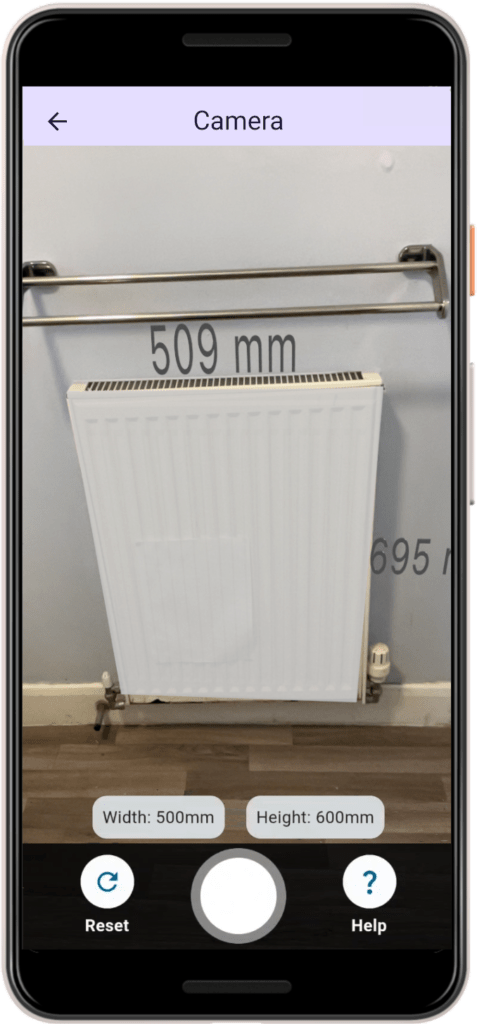
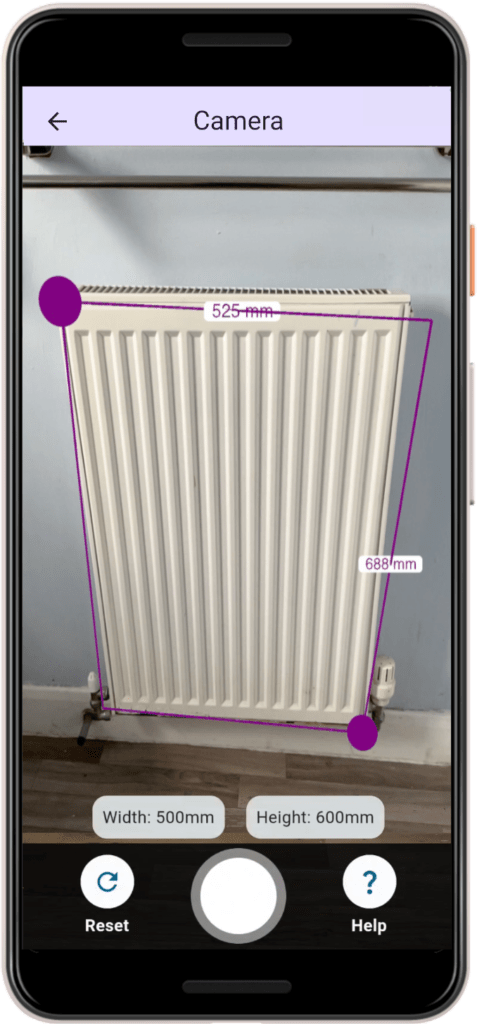
- The width and height will be displayed above the capture button.
- To reposition the markers, simple drag them into the desired position.
- To reset the markers, press the reset button to the left of the capture button.
- When you’re happy, press the capture button.
- Press the
take photobutton. - Move your device around to scan the room.
- Move the camera to align the top left radiator corner with the centre of the screen.
- Tap the screen to place a marker.
- Repeat for the bottom right radiator corner
- The width and height will be displayed above the capture button.
- To reposition the radiator model, drag its centre.
- To resize the radiator model, drag the edge or corner you wish to resize. Pinch gestures work, too.
- To reset the markers, press the reset button to the left of the capture button.
- When you’re happy, press the capture button.
- Press the
take photobutton. - Move your device around to scan the room.
- Move the camera to align the top left radiator corner with the centre of the screen.
- Tap the screen to place a marker.
- Repeat for the bottom right radiator corner
- The width and height will be displayed above the capture button.
- To reposition the markers, simple drag them into the desired position.
- To reset the markers, press the reset button to the left of the capture button.
- When you’re happy, press the capture button.
Manually Measuring a Radiator
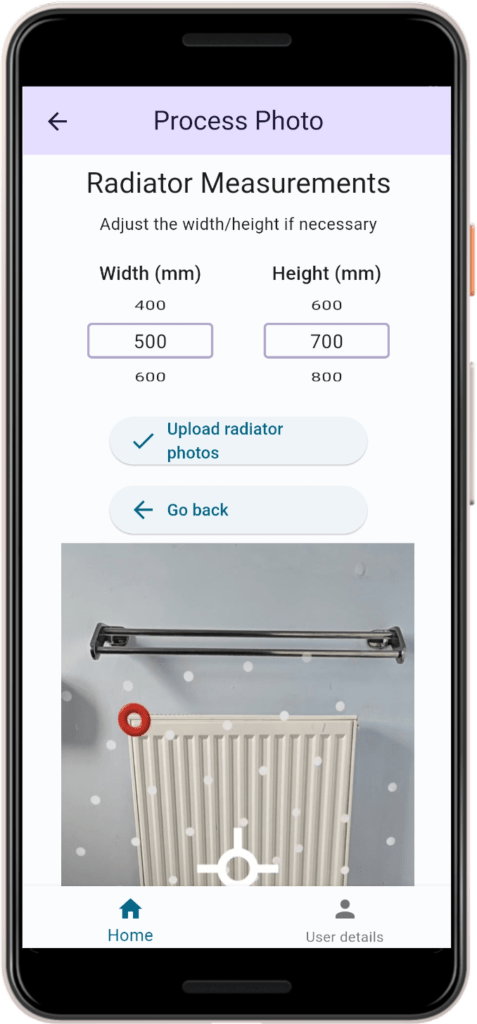
After taking a photo with the camera or uploading one from the gallery, you can enter the measurements manually:
- Scroll through the width and height values
- Press the
upload radiator photosbutton to save your changes.
Get a Radiator’s Type
To get a radiator’s type, you can either use your camera or you can manually upload a photo from your device’s gallery.
Using the Camera to Get the Radiator’s Type
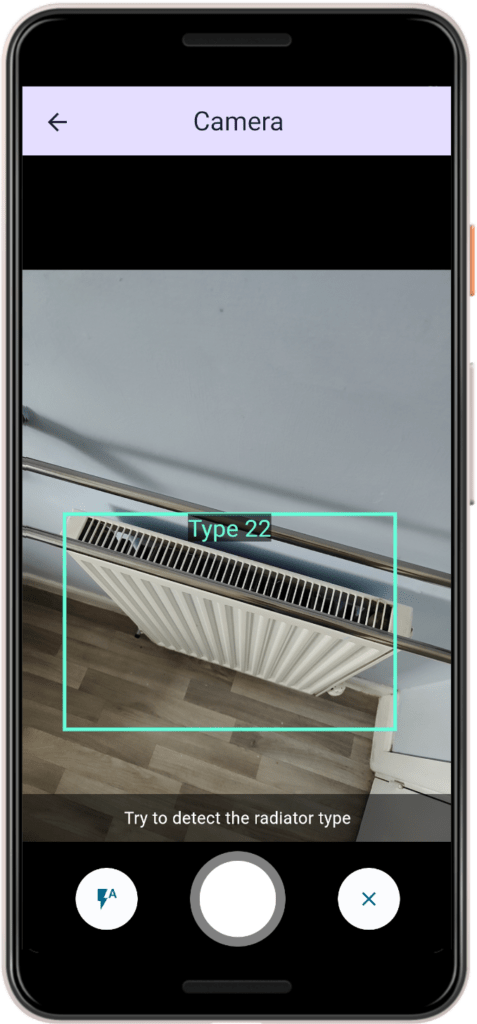
- Press the
take photobutton. - Get the radiator in view.
- A coloured box will appear around the radiator with a prediction of its type.
- Press the capture button.
Manually Enter a Radiator’s Type
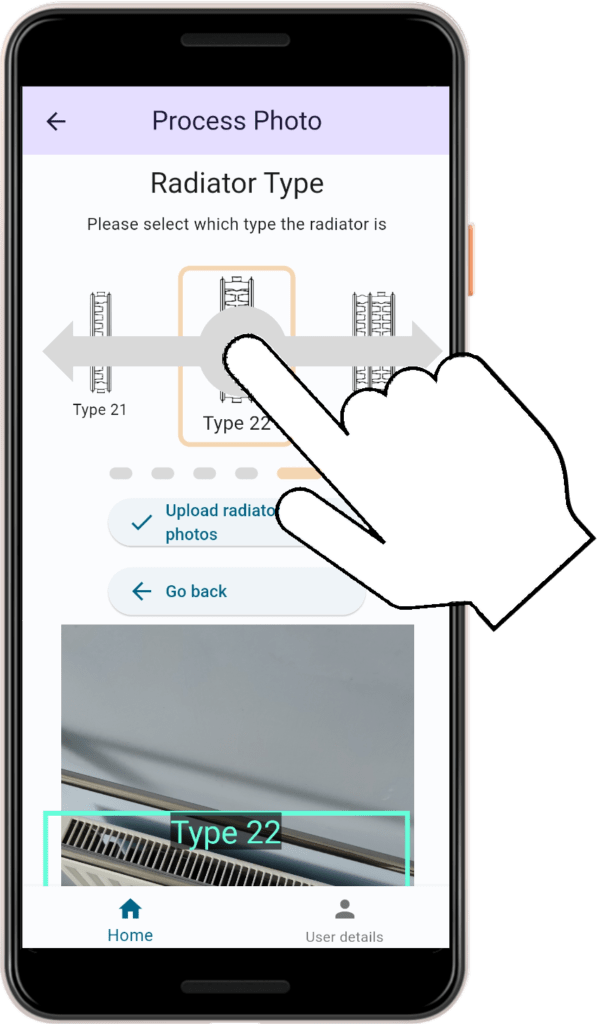
After taking a photo with the camera or uploading one from the gallery, you can select the radiator type manually:
- Drag the type selector left or right to change selection.
- Press the
upload radiator photosbutton to save your changes.
Generating Your Heat Output Report
First make sure you have enough money in your account before generating a survey report. You can check your account’s balance by navigating to the User Details page. If your balance needs topping up, please refer to the Topping Up Account section above. If you have sufficient funds, then continue with the following instructions:
Generating Your Report in Rhost

- On the home page, navigate to the
in progresstab - Select the survey from the list
- Press the
end survey and generate reportbutton - You report will be generated and shown to you
Generating Your Report in RHOSCARS
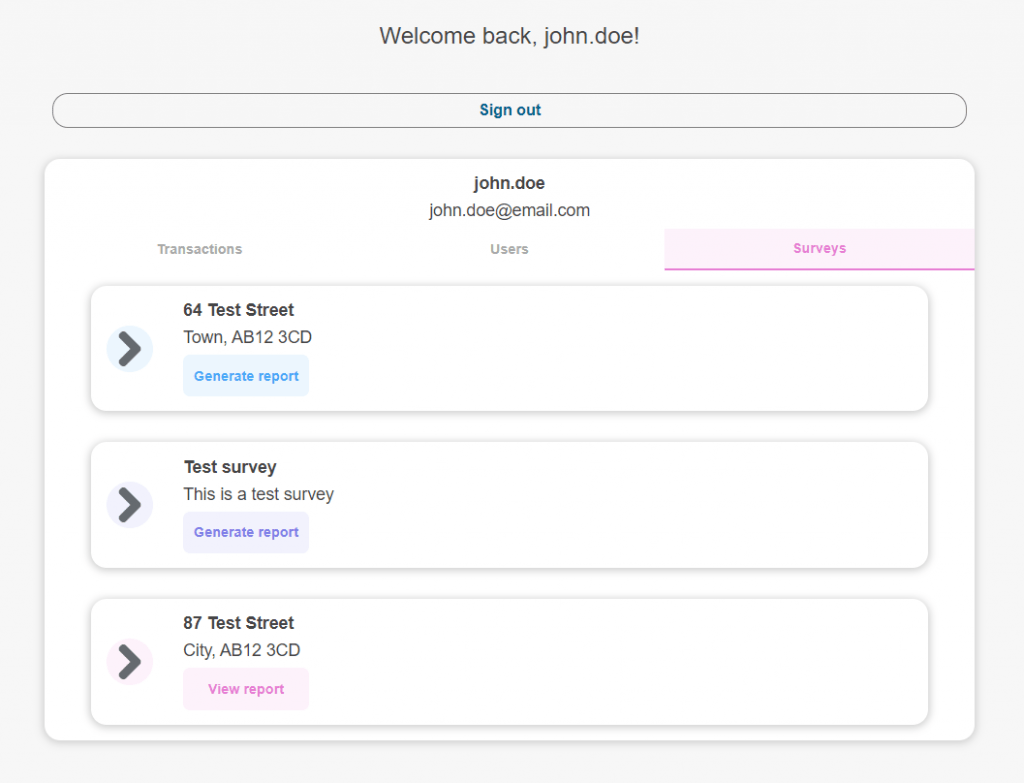
- Go to RHOSCARS.
- If not already, sign in to your account.
- Navigate to the
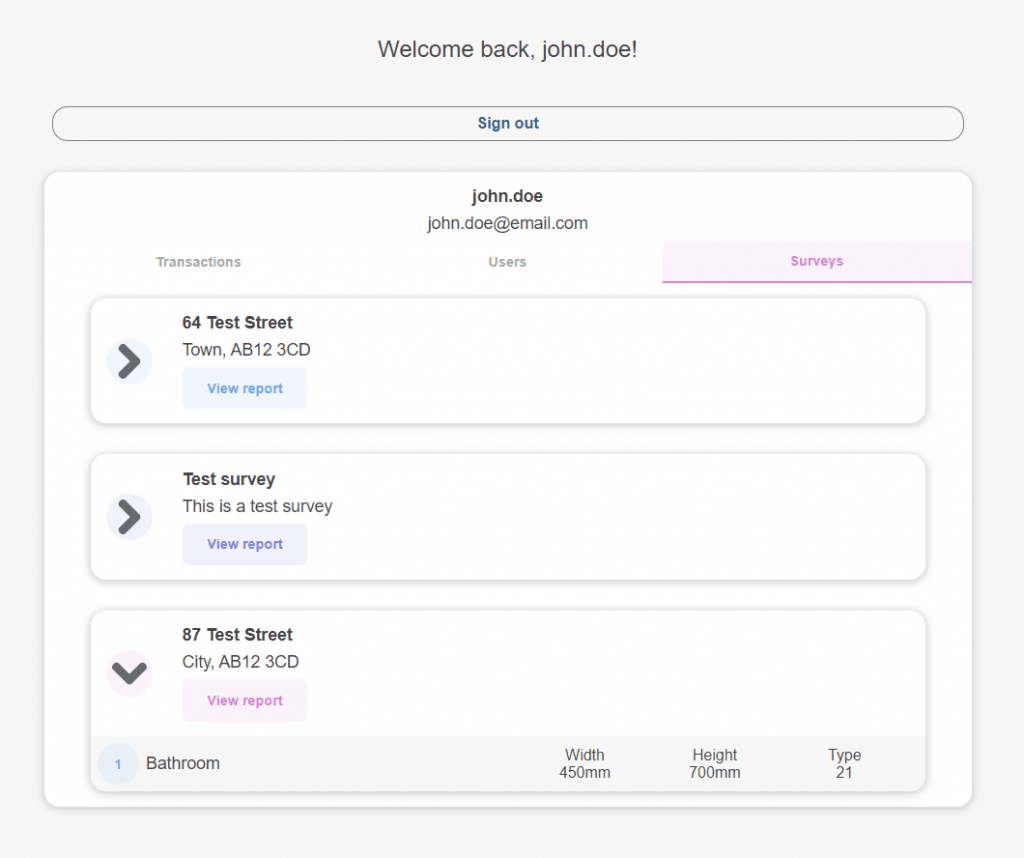
surveystab. Here you will be able to view the details of all your surveys. - Click the
generate reportbutton.
Viewing Your Heat Output Report
Viewing Your Report in Rhost
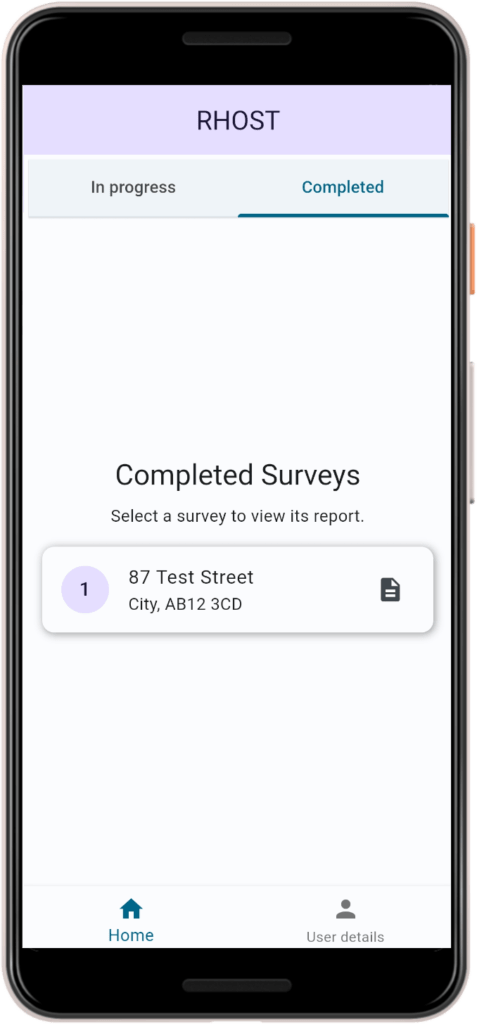
- On the home page, navigate to the
completedtab - Select the survey from the list
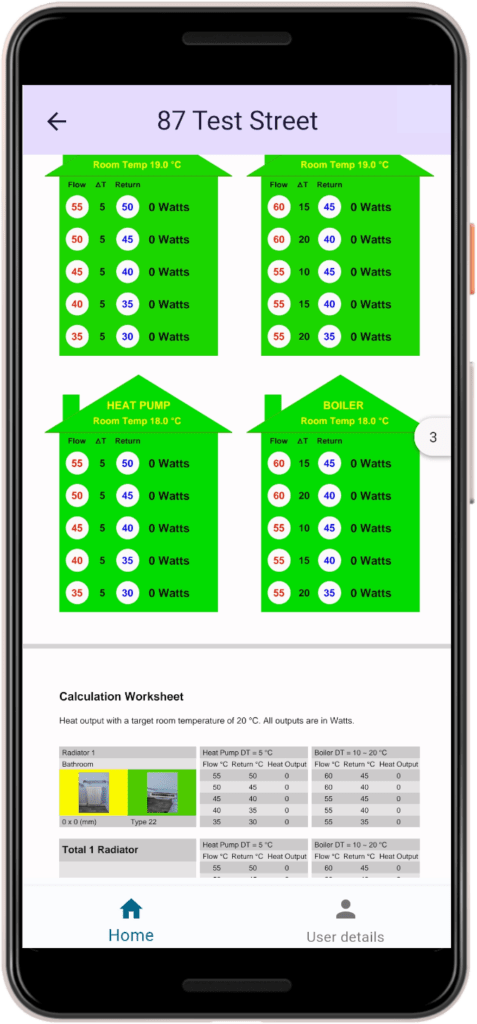
- The report will be shown to you
Viewing Your Report in RHOSCARS
- Go to RHOSCARS.
- If not already, sign in to your account.
- Navigate to the
surveystab. Here you will be able to view the details of all your surveys. - Click the
view reportbutton.
Editing a Survey
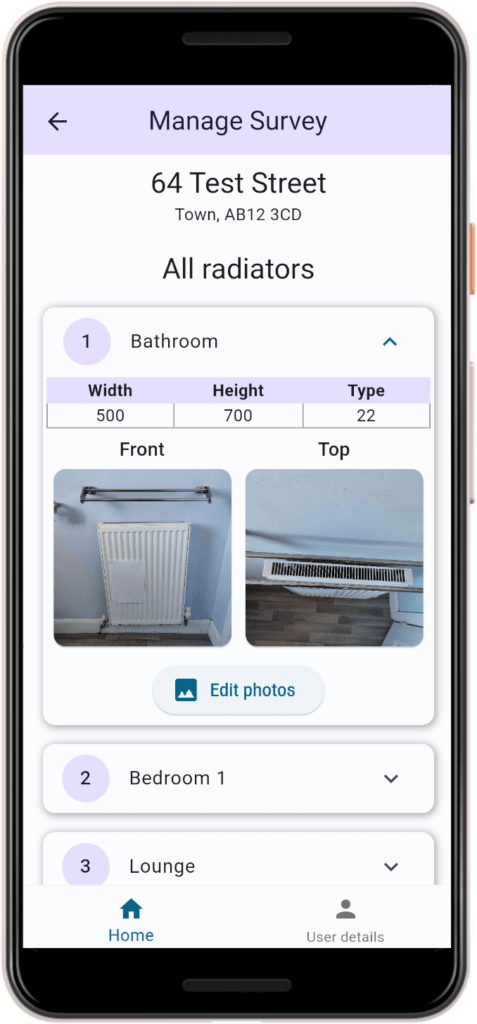
A survey can be edited by navigating to the in progress tab on the home page and selecting it. Once selected, you will be able to see all the radiators belonging to that survey. You can add additional radiators to this survey by pressing the add radiator button below the list of radiators.
A radiator can also be edited by selecting it from the list and then pressing its edit photos button.
Here is also where you can generate your heat output report. If you have sufficient funds in your account, pressing the end survey and generate report button will generate your report and display it to you.
Deleting an Account
Deleting your account will delete all the data associated with your account as well as any associate users and their data. This cannot be undone. If you are sure you would like to permanently delete your account, do as follows:
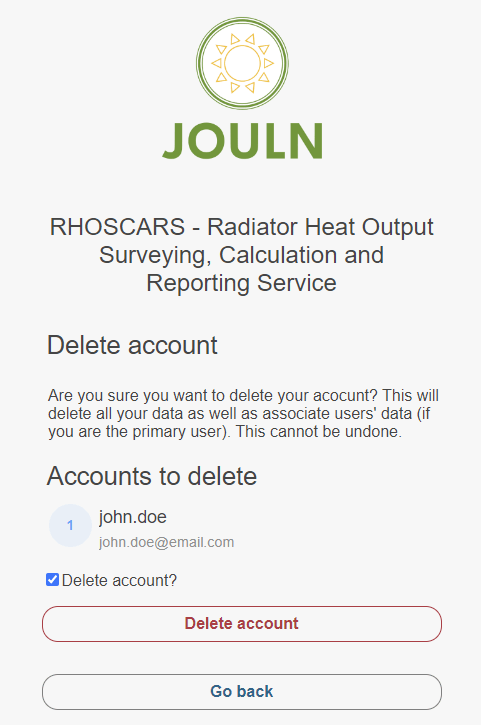
- Go to the RHOSCARS delete account page.
- Sign in to the account you would like to delete.
- Tick the
delete account?checkbox to confirm you are happy with your data being deleted permanently. - Press the
delete accountbutton. - Your request will be made, and you will be redirected to the success page.